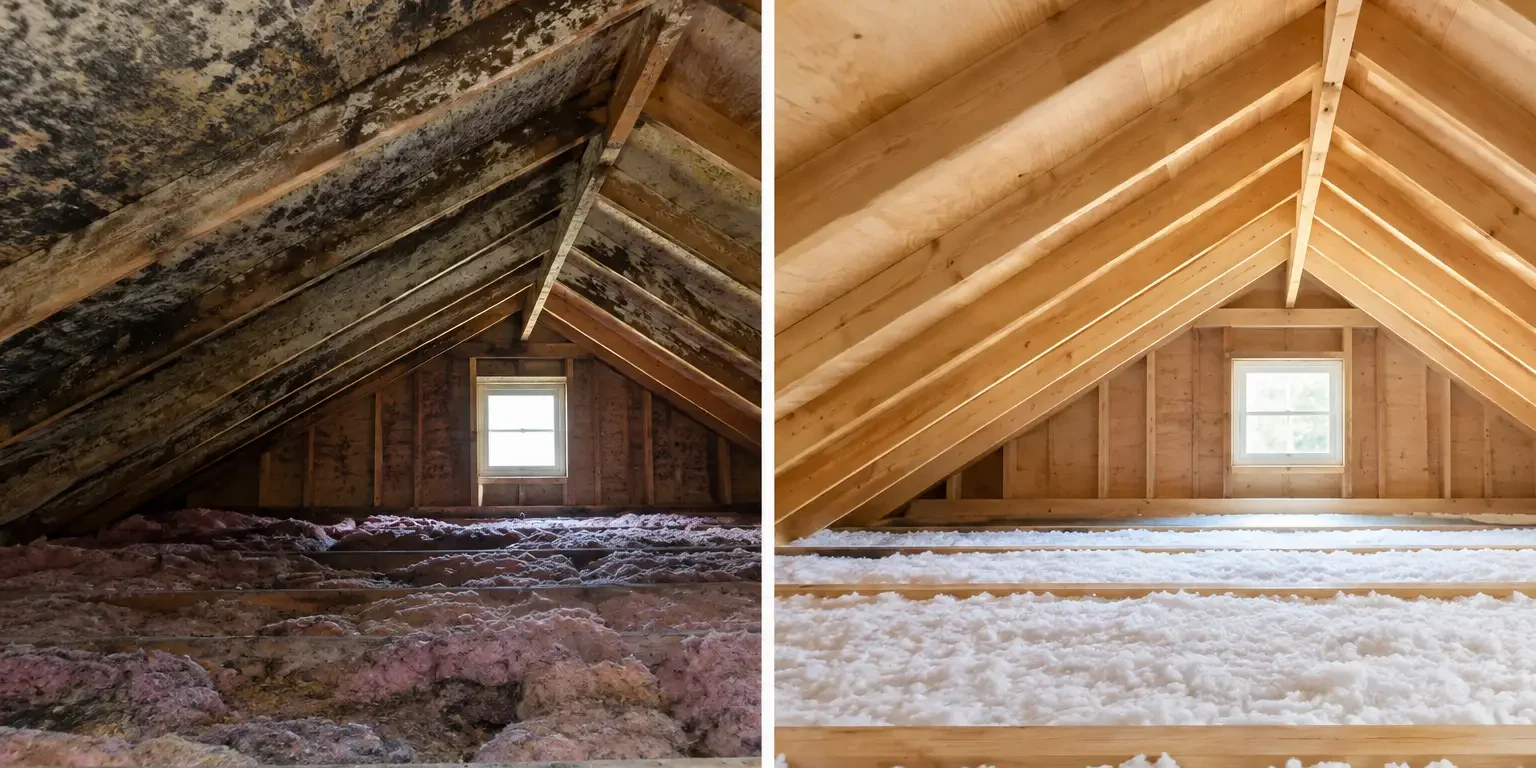
A dark stain on attic sheathing can look alarming, especially when it spreads across several roof boards. But attic mold cleanup before and after is not simply a matter of making wood look lighter. A proper result starts by correcting the moisture condition that allowed growth, then removing contamination under controlled conditions so mold particles are not pushed into the living space.
For homeowners, property managers, and business owners, the visible change matters. The less visible change matters more: a dry, properly ventilated attic with moisture conditions under control. That is what helps prevent the same problem from returning next season.
What Attic Mold Looks Like Before Cleanup
Before remediation, attic mold may appear as black, gray, white, green, or brown spotting on roof sheathing, framing, insulation, or stored materials. Color alone does not identify the type of mold or establish a health risk. Many different materials and conditions can create similar-looking stains, which is why diagnosis should come before treatment.
The most common attic pattern is widespread surface growth on the underside of the roof deck. In northern homes, this often follows winter condensation. Warm indoor air escapes through ceiling gaps around recessed lights, bath fans, attic hatches, plumbing penetrations, and unsealed top plates. When that humid air reaches cold roof sheathing, moisture condenses and can support mold growth.
A roof leak can create a different pattern: concentrated staining near a chimney, vent, valley, flashing detail, or roof penetration. In some cases, damp insulation, blocked soffit intake vents, inadequate exhaust ventilation, or a bathroom fan venting into the attic contributes to the problem. The pattern of damage helps point to the cause, but it does not replace a qualified inspection.
Why “Before and After” Photos Can Be Misleading
An attic can look dramatically better after a contractor sprays a coating over stained wood. That does not necessarily mean the contamination was properly addressed. Encapsulation may be appropriate in certain situations, but it should never be used to hide active growth, trap an unresolved moisture problem, or avoid necessary cleaning.
Likewise, bright wood is not automatic proof of a successful mold project. Some staining can remain after professional cleaning because pigments may have penetrated the wood. The goal is not to make every board look newly installed. The goal is to remove mold contamination to an acceptable condition, address the moisture source, and leave the attic clean and dry.
A credible contractor explains this distinction before work begins. Be cautious with anyone who identifies every dark area as a severe hazard without investigating, or who promises a permanent fix without discussing ventilation, air sealing, roof conditions, and humidity.
The Right Process Behind Attic Mold Cleanup Before and After
A professional attic mold project should follow a disciplined sequence. Skipping steps may make the job faster, but it raises the chance of cross-contamination, recurring growth, and unnecessary cost later.
1. Inspect the attic and identify moisture sources
The inspection should document visible conditions, moisture evidence, ventilation pathways, insulation levels, roof concerns, and air leaks between the home and attic. If testing is warranted, samples may help answer a specific question, such as whether suspect material is mold growth or whether indoor conditions require further evaluation. Testing is useful when it informs a decision, not when it is used to create fear.
The remediation scope should match the actual condition. A small, isolated area requires a different response than extensive growth across multiple attic sections or contamination following a major water event.
2. Correct the condition that fed the mold
This is the step that separates a lasting repair from a cosmetic cleanup. Depending on the findings, source correction may involve repairing a roof leak, reconnecting or extending a bathroom exhaust duct, improving attic air intake and exhaust, reducing excessive indoor humidity, or air-sealing ceiling penetrations.
Ventilation is not a universal cure. Adding more roof vents without adequate soffit intake, for example, may not solve condensation. Similarly, sealing every opening without a ventilation plan can create another problem. The right correction depends on the building design, local climate, roof assembly, and the source of moisture.
3. Set up containment and protect the home
Mold removal can disturb settled particles. For that reason, the work area must be controlled. Professional crews use appropriate containment methods, negative air where needed, and careful access procedures to reduce the chance that debris moves into bedrooms, hallways, or HVAC pathways.
Personal protective equipment is also essential for workers. Homeowners should not need to enter the attic during active remediation, and occupants with respiratory sensitivities should discuss reasonable precautions with the remediation team.
4. Remove contamination using the appropriate method
The cleaning method depends on the material and severity of contamination. Non-porous surfaces can often be cleaned. Porous materials such as badly affected insulation may need removal and replacement. Structural wood may be cleaned using methods selected for the condition of the surface, followed by detailed HEPA vacuuming and cleanup of settled debris.
There is no single product that is right for every attic. Strong chemicals alone do not correct moisture, remove all residue, or restore damaged building materials. A standards-based plan considers the material, the extent of growth, the source condition, and occupant safety.
5. Verify the attic is clean, dry, and ready for normal use
After cleanup, the contractor should conduct a detailed visual inspection and confirm that the area is free of visible debris and that the moisture issue has been addressed or is actively being corrected. Depending on the project and protocol, post-remediation testing may be recommended to provide an additional layer of documentation.
This verification step is particularly valuable for real estate transactions, rental properties, commercial facilities, and households where occupants have heightened concerns about indoor air quality. It creates a clear record of what was found, what was corrected, and what condition the space was left in.
What a Successful After Condition Should Show
After proper attic remediation, the roof sheathing and framing should be dry, visibly clean, and free of active-looking surface growth. There should be no damp insulation, disconnected exhaust ducts, obvious roof leaks, or unaddressed pathways allowing large volumes of conditioned air into the attic.
The attic should also function as a system. Soffit vents need to remain open rather than buried beneath insulation. Exhaust fans should discharge outdoors, not into the attic. Air sealing should reduce warm, humid air leakage from below. These details may not produce dramatic photographs, but they are often the reason the mold does not return.
In properties across New Jersey and nearby Northeast markets, winter conditions make this especially important. An attic that appears dry in summer can still develop condensation during a cold snap if heat and humidity are escaping from the home below.
When DIY Cleanup Is Not the Right Call
A homeowner may be able to address a very small, isolated surface area after the moisture source is corrected. Even then, working in an attic can be difficult and risky due to poor footing, hidden electrical hazards, limited access, and the possibility of disturbing insulation or spreading debris.
Professional help is the safer choice when growth is widespread, the source is unclear, materials are wet or damaged, occupants have health concerns, or the property needs documentation. It is also appropriate when prior cleaning failed and the stains or odors returned.
Certified Mold Removal Inc. approaches attic concerns by diagnosing the source first, establishing a clear remediation plan, and performing controlled cleanup designed to protect the property and its occupants. Fast action is wise after finding attic mold, but the work should be based on evidence, not pressure.
If you see staining overhead, do not judge the situation by appearance alone. Have the attic evaluated, correct the moisture pathway, and insist on a cleanup process that leaves the space not only better-looking, but dry enough to stay that way.