That dark patch under a window or the musty smell in a lower level room can push people into one of two bad decisions – ignoring it or overreacting. A good guide to indoor mold testing starts in the middle ground. Testing has a real purpose, but it only helps when it is tied to a proper inspection, moisture diagnosis, and a plan to correct the source.
That distinction matters. Not every mold issue requires lab testing, and not every test result tells you how serious the problem is. What protects your property and indoor air is a disciplined process: identify where moisture is coming from, determine whether mold growth is active, measure the extent of contamination when needed, and only then decide what cleanup or remediation is appropriate.
What indoor mold testing is actually for
Indoor mold testing is not a magic yes-or-no answer. Mold exists naturally in the environment, and a certain level of spores is normal. The real question is whether the building has an abnormal mold condition tied to water intrusion, elevated humidity, poor ventilation, or hidden damage.
Testing is most useful when there is uncertainty. You may smell mold but not see it. You may have had a leak behind a wall and want to know whether contamination spread. You may be a property manager dealing with tenant complaints about air quality. In those situations, testing helps document conditions and support the next step.
It is less useful when mold growth is already obvious on a porous material after a known water event. If drywall is visibly colonized and damp, the need is usually not more debate. The need is source correction, safe containment, and removal based on accepted remediation practices.
When a guide to indoor mold testing says you should test
There are several situations where testing makes sense. One is hidden mold suspicion. If a room smells earthy or stale but surfaces look clean, air or cavity sampling may help confirm that spores are being released from behind walls, under flooring, or above ceilings.
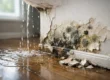
Another is after water damage. A burst pipe, roof leak, basement seepage, or repeated HVAC condensation can create mold conditions in places you cannot easily inspect. Testing can help determine whether moisture exposure turned into contamination.
Testing can also be appropriate before and after remediation. Before work begins, it helps define the scope. After work is complete, clearance-style evaluation can help confirm that affected materials were properly removed, cleaned, and contained so the indoor environment has returned to normal conditions.
For commercial spaces, testing may be part of risk management. Offices, retail spaces, multifamily buildings, and healthcare-adjacent properties often need written findings, sampling records, and a remediation protocol to support decision-making and protect occupants.
When testing is not the first step
A common mistake is buying a DIY kit before anyone has inspected the property. That often produces a result that is technically true but practically useless. If the test detects mold, you still do not know the source, the extent, or whether the reading reflects an indoor problem versus normal outdoor background.
A visual inspection is usually the first step because mold follows moisture. An experienced inspector looks for roof leaks, plumbing failures, window intrusion, foundation seepage, humidity imbalances, condensation patterns, and ventilation defects. If those conditions are missed, testing alone can send you in the wrong direction.
This is where professionalism matters. Fear-based companies may use any positive sample to push large cleanup jobs. On the other side, general contractors may dismiss mold without checking containment needs or air quality concerns. The right approach is factual, measured, and standards-driven.
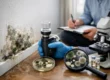
The main types of indoor mold testing
Air sampling is one of the most common methods. A calibrated pump pulls air through a collection cassette, and the sample is analyzed by a laboratory. This can help compare indoor conditions to outdoor control samples and show whether certain areas have elevated spore levels or unusual mold types.
Surface sampling is used when visible growth is present or when a material has suspicious staining. Tape lifts and swabs can help identify the type of mold on a surface. This is useful for documentation, but it has limits. A surface sample tells you what is on that spot, not necessarily how far contamination extends behind or around it.
Bulk sampling involves removing a piece of material such as drywall, insulation, or carpet for analysis. This is less common in routine residential situations, but it can help when deeper material confirmation is needed.
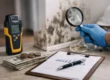
Moisture mapping is not mold testing in the lab sense, but it is one of the most important diagnostic tools in the process. Moisture meters, thermal imaging, and humidity readings help locate conditions that support growth. If moisture is still present, cleanup without repair will not hold.
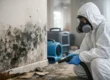
What a professional inspector looks for
A qualified mold professional is not just collecting samples. The inspection should connect building conditions to contamination risk. That means evaluating visible mold, water stains, soft materials, crawlspaces, attics, HVAC components, bathroom exhaust performance, window condensation, and any area with a history of leaks.
The inspector should also ask practical questions. When did the odor begin? Was there recent flooding? Has anyone painted over staining? Are there health complaints that improve when people leave the building? Have dehumidifiers or fans been running constantly? Those details often explain more than a single lab report.
In many cases, the most valuable outcome is not simply identifying a genus of mold. It is defining why the mold is there, what materials are affected, and how to remove it without spreading contamination into occupied areas.
How to read mold test results without panic
Mold reports can look more alarming than they are. Scientific names, spore counts, and lab terminology often cause people to assume the worst. The truth is more nuanced.
Some mold types are more associated with chronic moisture or water-damaged materials, while others are common outdoors and may appear inside in low amounts. A result matters most when it is interpreted in context. Elevated indoor counts compared with outdoor samples, the presence of water-damage indicator molds, and results that match visible or hidden problem areas are more meaningful than a raw number by itself.
Also, not all mold is equally hazardous in every situation. Sensitivity varies by person, exposure duration, building conditions, and the amount of disturbance. That is why responsible professionals avoid blanket statements. The goal is not to create fear. The goal is to identify abnormal conditions and correct them safely.
DIY kits versus professional testing
DIY kits appeal to homeowners because they are cheap and fast. The trade-off is accuracy and interpretation. Many settle plates and consumer kits are not designed to capture a reliable picture of indoor air conditions. Even when a lab processes the sample, the report may not tell you what action is necessary.
Professional testing costs more, but it gives you something far more useful: a chain of observations, calibrated sampling, moisture diagnostics, and a written basis for next steps. For a homeowner deciding whether a small issue is localized or widespread, or for a property manager who needs documentation, that difference matters.
If you are dealing with an active leak, recurring odor, tenant complaint, real estate transaction, or visible growth in multiple rooms, professional inspection is usually the safer move.
What happens after testing
Testing should lead to a decision, not a file that sits in your inbox. If results show normal conditions and no active moisture problem, you may only need minor cleaning, ventilation improvements, or monitoring. If results support hidden contamination, the next step may be opening a wall cavity or defining a limited remediation area.
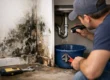
When significant contamination is found, proper remediation should focus on containment, source correction, removal of unsalvageable materials, detailed cleaning, and post-work verification when appropriate. Simply spraying chemicals or painting over affected surfaces is not remediation. If moisture remains, mold returns.
For occupied homes and businesses, the process also needs to protect people during the work. That means controlling dust and spores, isolating work zones, and preventing cross-contamination to clean areas.
Choosing the right help
If you are hiring someone for indoor mold testing, look for certification, insurance, and a process that starts with diagnosis rather than sales pressure. Ask whether they use moisture detection tools, whether they explain when testing is and is not necessary, and whether they can provide a written remediation protocol if contamination is confirmed.
In parts of New Jersey and the surrounding region, fast response matters because mold problems rarely stay the same for long. What begins as a small leak behind baseboards can become a larger indoor air quality issue after a few humid days. The right company responds quickly, but just as important, it follows procedure and avoids shortcuts.
A good guide to indoor mold testing should leave you with one clear idea: testing is not the goal. Clarity is the goal. Once you know whether mold is present, why it developed, and how far it spread, you can protect the building and the people in it with confidence instead of guesswork.